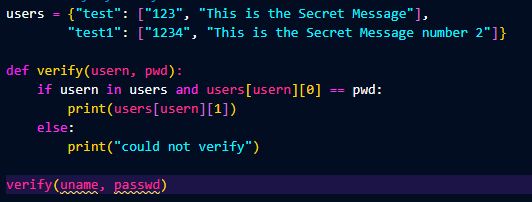
Authentication - What is it?

Authentication in cybersecurity is just verifying a persons identity. We do this in three different ways, verifying something you know, verifying something you have, and verifying something you are.

Something You Know

The easiest of the three, the most basic way we do this is through usernames and passwords.

Something You Are

This falls under things like biometrics, Fingerprints and Facial Recognition.

Something You Have

An artifact in your possession. This could be RFID Cards, Tokens, or your cell phone.

Usernames and Passwords

Basic Concept

When I first start to build out a project, I like to make a basic concept. This is where I build out the idea with no bells and whistles. For username and password authentication I want to build a function, that takes in a username and password. Then it searches a list of users for the specific one. Checks if the password is correct, and returns a secret message.

Flask and SQLalchemy

Now that we have a concept, I had to pick out what I wanted to do for a stack. Previously I had worked with Django, and had heard that Flask was like a light version of that. Seeing as I want to focus on the backend for this project I thought it would be a good idea being light and easy to work with. As for SQLalchemy, it comes with flask as well. We need flask to build out endpoints to register and login our users, and we need a SQL database to hold all of our users.

This may seem like we jumped ahead a ton, but we will go through it line by line so I can explain what is going on. 
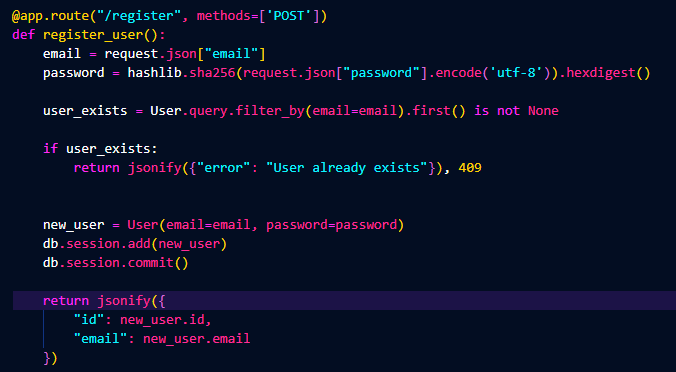
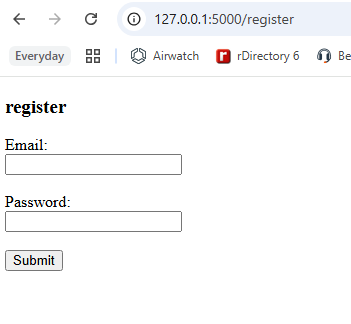
This is the first endpoint we created. It is to register a user into our database. It takes in a POST request, which means it recieves data, specifically an email and password. The password portion is immediately encrypted using SHA256. The database is then checked to see if the email exists, if it does not a new user with the email and password is created and saved into the database.

SHA256 and Encryption

We picked SHA256 because another student requested it. We needed a way to encrypt the password so that when the database is attacked, the attackers will just get a hashed password, and the users actual password will be saved from the attack.
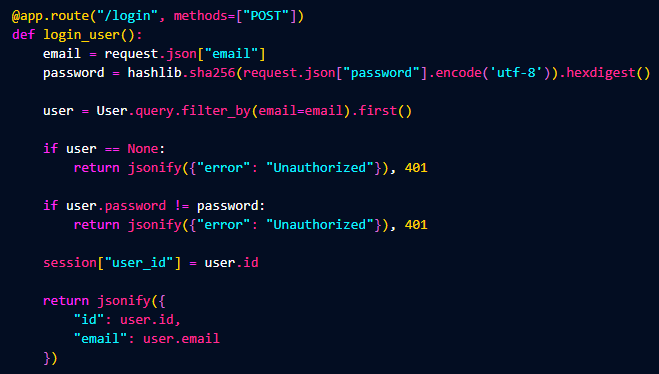
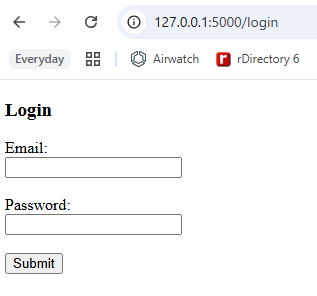
Login Session

Now for the login portion. It will be the same as our basic concept program above, just searching the database for the user, then verifying the user exists, 
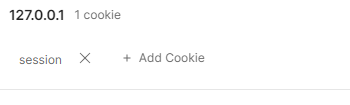
and verifying their hashed password. The part that changes is the session that we create. We send the server login credentails and it sends back a cookie that is stored on our browser that tells the server what user we are.
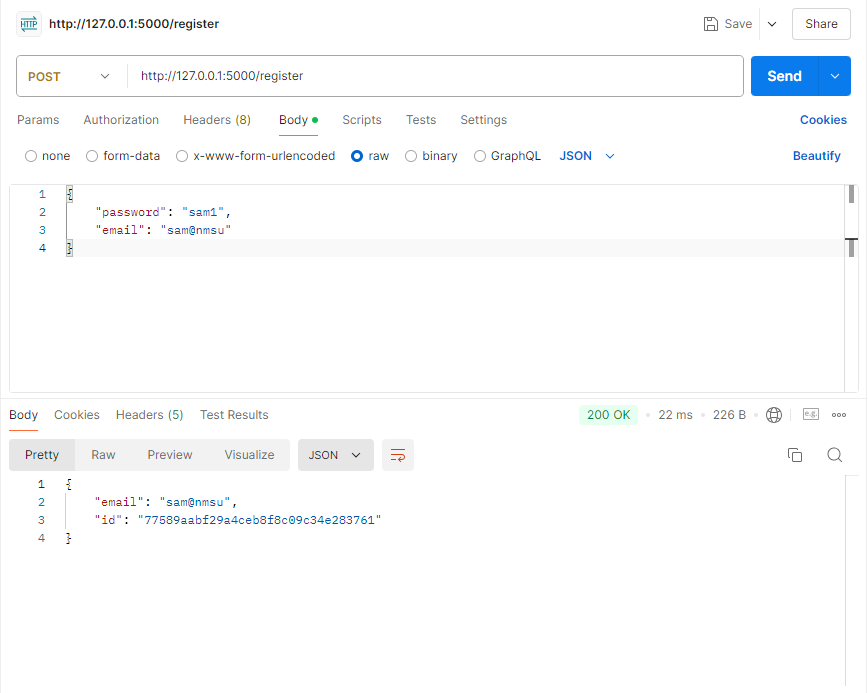
PostMan

This project I wanted to focus on the backend, so to send information to the server we will be using a program called PostMan. With this program we can send and retrieve information from our back end flask server. We send the information in the form of a JSON in the body of the request. The server then reads the JSON and assigns the variables to what they need to be and sends PostMan a session cookie to keep track of what user is logged in.

Front End Update

To build this project out, I decided to add in a front end so people can test the register and login features without having to use an application. Now from the browser if you would like to go to register, there is a form to enter information as well as in the login endpoint.

Fingerprint Scanner

The Plan

The plan for the fingerprint scanner is to connect the fingerprint scanner to the raspberry pi. Then when the scanner sends an ID, the ID is checked in a list of users, if the user is in the list then the door will unlock, and the person will be logged into the doors history. I think for this project I want to use CSV files for both users and door history.

CSV Basic Concept

We know that the fingerprint scanner is going to return an ID of the person whos finger was scanned. Using this information we can build out what we want to do with that information prior to setting everything up to get a basic understanding of what we want to do and how we want to manage the CSV files. The idea is to get an ID, then use that ID to search a users.csv file for the specific user. Then send the user information over to the door history CSV to log the people going in. It will look something like this when the user is logged.

Hardware Setup

Luckily the hardware setup for the fingerprint scanner to the Raspberry Pi is extremely easy and well documented. For this I am using a Raspberry Pi 4 And the fingerprint scanner I am going to be using is the Adafruit Fingerprint Scanner. As you can see from the picture above we are just connecting 4 wires, the 3.3 volt, ground, transmit, and recieve data. The Adafruit fingerprint scanner also comes with test code to make sure everything is functioning as intended. Now all I have to do is combine the CSV basic concept code with the Fingerprint scanner, so everytime a fingerprint is scanned, a log is made into the Door History CSV.

Combining CSV and Scanner Code

What we want to do is when a fingerprint is read, it will activate the read user function. Since we already built out the CSV reader all we really need to do is import the function and call it when a fingerprint is read and an ID is returned. This is what we're doing near the bottom, when the confidence value is certain that the fingerprint is that ID, it starts off the read_user() function. This in turn searches the users CSV file for said user and if the user is found, logs them into the Door History CSV.

Final Setup

Now that everything is patched together, we can see how everything functions.

First we need to enroll the fingerprint and match it to a user. When enrolling a fingerprint, I have a user profile made in users CSV that links that fingerprint to the user.

Now when we scan that fingerprint, it will print the ID to the screen. In the background everything else is being logged into the proper CSV's as well.

Email Verification

The Plan

So for the last bit of authentication we are going for is email verification. The idea is once you log in with username and password, an email is sent to the registered email with a code that needs to be input to procede. This will create multifactor authentication, with both something you know(The username and password) and something you have(access to the email). Luckily we already built a username and password system earlier in the project, this will be serving as our base. Remember if we write reusable reusable code we can save the headache of redoing things.

Sending Email

Sending an email works somewhat like creating a CSV like in the last part. Except now we are using SMTPLib, a library used to create emails. We also set up an email with Google to act as our automated email. And like in the Django app we are using a dotenv file to keep the password to that email address hidden, so it doesn't get posted on the internet.

Verifying the Email

Now all we have to do is after the username and password are checked, we create a random 6 digit number with random integer, if it ends up being less than 100000 we will turn it into a string and pad out the left side with 0's until it reaches 6 digits. Then that number is sent with the email. Then an input prompts the user for the number. When that number is input then the user will finally get the secret message.

All Together

We enter the email, and the password. It prompts us for the 6 digit number while simultaniously sending the email.

We enter that 6 digit number into the terminal and it produces the secret message.


Find me on ...